

Introduction
Laravel MySQL provides a fully managed MySQL database for your application. Each Laravel MySQL database cluster is assigned a compute and storage size, and can be scaled at any time. Storage can also be upsized automatically as your data grows. Flex sizes can scale to zero when idle.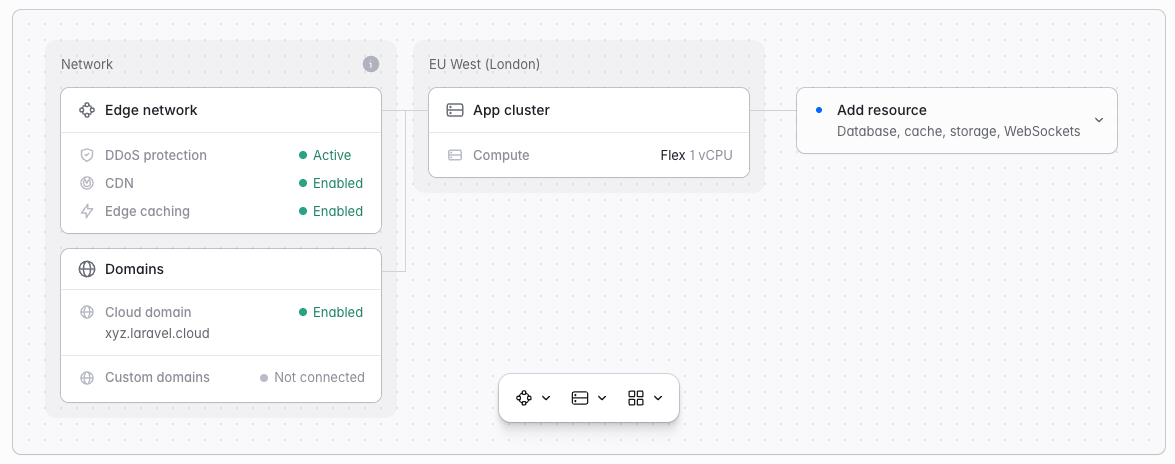
Creating MySQL databases
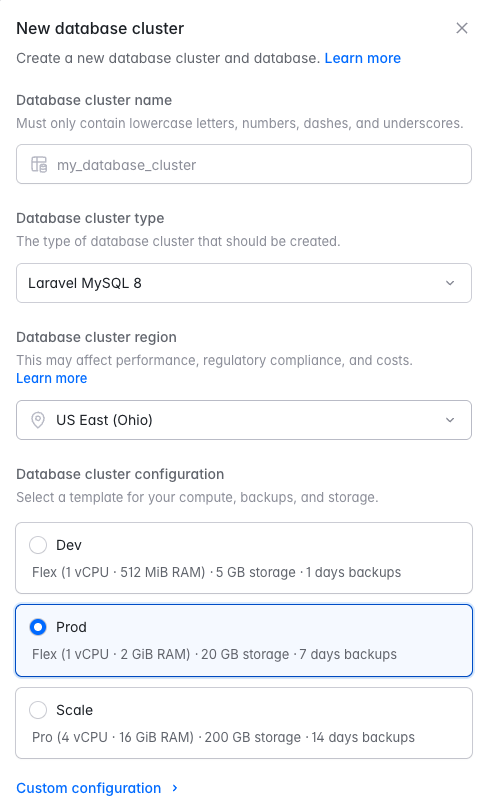
To create and attach a MySQL database to an environment:- Navigate to your environment’s infrastructure canvas dashboard
- Click “Add database”
- Select an existing database cluster or create a new one:
- To create a new cluster: Select “Laravel MySQL” as your database cluster type and configure:
- Cluster name: A unique name for your database cluster
- Instance size: Choose from available compute options (Flex or Pro sizes)
- Storage: Configure storage from 5GB to 1,000GB
- Region: Must match your compute cluster’s region
- To create a new cluster: Select “Laravel MySQL” as your database cluster type and configure:
- Select an existing database within the cluster or create a new one:
- Database name: The name of the database within the cluster
You can also create MySQL databases from your organization’s Resources page, but they will need to be attached to an environment separately.
A database cluster must be in the same region as the environments that attach to its databases.
Database clusters vs. databases
When creating a new database cluster, you will be asked to provide the desired name of the cluster and the desired name of the initial “database” that will be created within the cluster. Each database cluster can have as many databases as needed within the cluster. In web development, these databases are sometimes referred to as “schemas”. Environments attach to a database, not to a cluster. When attaching, you first choose the database cluster and then select the database within it that you want to make available through theDB_DATABASE environment variable.
Editing and resizing database clusters
To edit your database clusters and adjust their compute / storage settings, navigate to Organization > Resources > Databases and click the … icon for the database cluster you would like to edit or resize. Then, click Edit settings. Changing the compute size restarts your database cluster. Expect under a minute of downtime while the cluster restarts. Your data is not affected.Laravel MySQL storage can only be increased once every 6 hours and cannot be decreased.
Automatic upsizing
Laravel MySQL databases can automatically increase their storage once they reach 90% of their allocated space. The database stays online while the increase is applied and the additional storage becomes available immediately. Each increase grows storage by 50% of the current allocation, rounded to the nearest 5GB, so larger databases receive proportionally more headroom. You can also set a maximum size for each database, and automatic upsizing will not grow a database past that limit. Each database is automatically upsized at most once every 6 hours. Laravel Cloud sends a notification when a database reaches 75% of its allocated storage, and another at 90%, when the upsize takes place. Each notification states the size the database will grow to and what the change adds to your monthly cost. Automatic upsizing is enabled by default on all newly created databases.Monitoring database cluster metrics
To view metrics such as CPU, write throughput, and storage for your database cluster, navigate to Organization > Resources > Databases, click the database cluster card, and review the Metrics section. Use the time range selector to adjust the period shown.Deleting database clusters
To delete a database cluster, navigate to Organization > Resources > Databases and click the … icon for the database cluster you would like to delete. Then, click Delete and confirm your action.Scale-to-Zero
Laravel MySQL Flex sizes can scale to zero, sleeping when your database cluster is idle so that you are not billed for compute. The cluster’s storage stays online the entire time it sleeps, so your data is always preserved. Storage is billed as usual while the cluster sleeps. A database cluster goes to sleep when it has received no connections for its configured idle timeout, which may be set between 1 minute and 1 hour. The next connection wakes the cluster automatically. Because every Laravel MySQL database cluster is fronted by a proxy layer, the incoming connection is held while compute resumes and forwarded once the cluster is awake, so your application sees a slightly slower first query instead of a connection error. Waking typically adds a few hundred milliseconds to that first query, increasing with the amount of RAM used by the cluster. Scheduled backups and manual snapshots briefly wake a sleeping cluster and let it return to sleep once complete. Scale-to-Zero is available on the Flex sizes in all regions. New database clusters use the current generation of Flex and Pro sizes, and previous-generation sizes are no longer offered. Existing clusters continue to run on their current size and pricing unchanged. Pro sizes are always-on and do not scale to zero. Pairing a Flex database cluster that scales to zero with application compute and a Laravel Valkey cache that scale to zero helps minimize costs on development environments and side projects.Importing MySQL data
After enabling your MySQL Public Endpoint, you can use any standard database tools to import your SQL data. For optimal performance, we recommend generating database dumps with the--skip-extended-insert option, especially for smaller Laravel MySQL instances, to reduce memory usage.
Recommended MySQL import tools
The following tool offers efficient and reliable database imports, particularly for larger datasets: This tool supports parallel execution, making it significantly faster than the traditionalmysqldump and mysql commands when handling large databases. Additionally, GUI-based tools like TablePlus can be used for imports. However, be aware that smaller Laravel MySQL instances may encounter memory limitations when using such tools.
Database sizing and performance
Choosing the right cluster size
Several key factors influence the right database cluster size for your workload: connection requirements, queue workload, backup retention needs, and planned database migrations.Connection limits
The amount of RAM your database cluster has determines how many simultaneous connections it can support:All database clusters are fronted by a proxy layer in Laravel Cloud, which helps multiplex connections for read-only queries, enabling up to 10,000 connections in some conditions. However, writes and transactions cannot be multiplexed, so those count against your MySQL connection limit. Plan your cluster size based on your expected mix of reads and writes.
Queue workload considerations
If your application runs queue workers with a low--sleep interval (such as --sleep=1 or lower), expect high CPU usage. That’s acceptable for development environments, but in production, we recommend a minimum of 2 vCPUs, possibly more for high-throughput jobs.
Backup retention planning
Backups are essential—especially for production databases. If you’re working with a disposable or development database, it’s fine to set the retention period to 0 days. For anything else, we recommend at least 2 days of backup retention for basic protection and recovery.Database migrations and imports
Planning to transfer or import a database? You may need to temporarily scale up your database cluster’s CPU and memory to handle large or fast MySQL imports.- CPU and memory can be scaled up and down at any time, with under a minute of downtime while the cluster restarts
- Storage size can only be increased—not decreased—so plan for long-term needs before import
Database backups
Laravel MySQL database clusters support automated and manual backups.Backup configuration
To configure backups for your MySQL database cluster:- Navigate to Organization > Resources > Databases.
- Click your Laravel MySQL database cluster.
- In the Backups section, click Settings.
- Enable or disable the Backups toggle. When enabled, configure Backup retention to choose how long to keep automatic daily backups.
- Click Update to save your settings.
Backup retention period
When automatic backups are enabled, you can configure the retention period from 1–30 days. Automatic backups occur during a daily 3-hour backup window, scheduled between 3AM and 6AM EDT.Manual backups
To create a manual backup, click New backup in your database cluster’s Backups section, provide a name and an optional description, and click Create backup. You can create manual backups at any time, regardless of your automatic backup settings.Restoring from backups
Backups restore to a new database cluster rather than overwriting the existing cluster. In your cluster’s Backups section, find the backup you want to restore, click its … menu, and select Restore. Enter a name for the new database cluster and click Restore backup to confirm. Once the backup has been restored, you will now have two database clusters, the original database cluster and a database cluster restored from the backup you selected. At this point, you can either detach the original database from your environment and attach the corresponding database from the restored cluster, or connect to each database and selectively restore any missing information you might have. When you no longer need one of the database clusters, you may delete it.How to download a backup
Laravel Cloud stores backups as internal snapshots and does not expose them as rawmysqldump files. To download a copy of your data:
- Restore the desired backup into a new database cluster so your production cluster remains untouched.
- Enable the restored cluster’s public endpoint and copy the credentials (see Connecting to database clusters).
- Use your preferred tool (TablePlus,
mysqldump, mydumper, etc.) to export or download the data to your machine.
Backup pricing
Laravel MySQL backup storage is billed separately from database storage:- Storage pricing:
$0.10/GB-mo(US regions) and$0.12/GB-mo(other regions) - Backup pricing: Billed at the same rate as storage pricing
Connecting to database clusters
From your application
When a database is attached to an environment, Laravel Cloud automatically injects database connection environment variables, includingDB_HOST, DB_USERNAME, DB_PASSWORD, and DB_DATABASE. You may view these variables in your environment’s General Settings.
From your local machine
To connect to your database from your local machine using a database management client like TablePlus, navigate to Organization > Resources > Databases, click your database cluster, and click View credentials at the top of the page. To view credentials for a specific database, use its … > View credentials menu in the Databases section.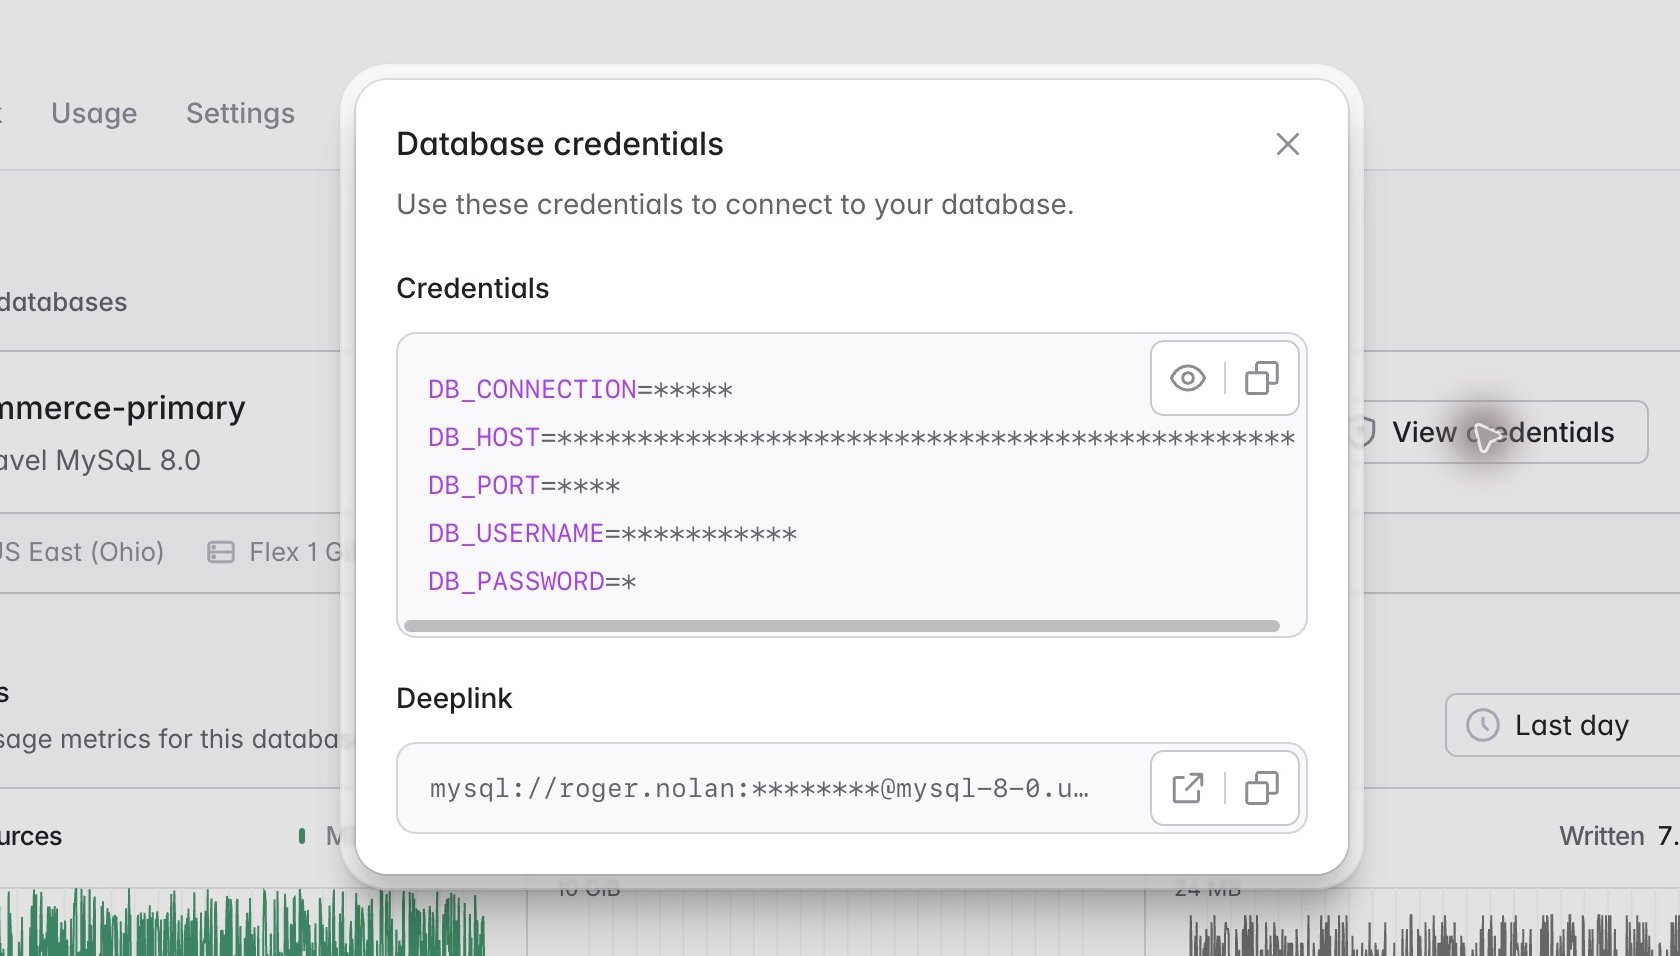
MySQL public endpoints
Before connecting to a MySQL database cluster, you must enable its public endpoint. From your organization’s Resources page, navigate to the Databases tab and click the … icon for the MySQL database cluster you would like to connect to. Then, click Edit settings and enable the Enable public endpoint toggle. Once the public endpoint has been enabled, open the MySQL database cluster page and click View credentials. When you are finished interacting with your database from your local machine, you may disable the public endpoint.Laravel MySQL SSL connections
Public endpoints present a certificate issued by a public certificate authority (Let’s Encrypt), so your client can verify the server’s identity using your operating system’s built-in CA bundle. You do not need to download a certificate. Traffic is encrypted between your client and Laravel Cloud’s proxy layer. The proxy’s connection to the underlying database runs within Laravel Cloud’s private network and is not separately encrypted. Laravel applications Laravel applications that connect over SSL should add the following environment variable, which Laravel passes to PDO asMYSQL_ATTR_SSL_CA (Pdo\Mysql::ATTR_SSL_CA on PHP 8.4 and later):
mysql client, connect with VERIFY_IDENTITY mode and point --ssl-ca at your system CA bundle:
The
mysql client refuses the VERIFY_CA and VERIFY_IDENTITY modes unless you also pass --ssl-ca. The bundle path above is correct for most Linux distributions; on macOS, use /etc/ssl/cert.pem.Database users
Every database cluster is created with a default user, whose credentials Laravel Cloud injects into your environment as theDB_USERNAME and DB_PASSWORD environment variables. In addition to this default user, you may create additional users with their own credentials and access level. For example, you might create a read-only user for a reporting tool or a scoped user for a background service. Database users are supported on both RDS MySQL, RDS Postgres and Laravel MySQL clusters.
Creating a database user
To create a new database user:- Navigate to Organization > Resources > Databases and click the database cluster.
- In the Database users section, click New user.
- Configure the user:
- Username: A unique username for the user
- Permission: Choose Read-only or Read-write
- Access (optional): Restrict the user to specific databases within the cluster
- Click Create database user.
The default user injected into your environment cannot be edited or deleted.
Read-only vs. read-write access
- Read-only users may query data but cannot insert, update, or delete records or modify the schema. This is ideal for reporting dashboards or teammates who only need to inspect data.
- Read-write users have full read and write access to the schemas they are scoped to.
Database upgrades
Laravel MySQL database clusters may periodically require an upgrade to stay secure and compatible with our latest features. To check if your cluster requires an upgrade, go to Organization > Resources > Databases and click the … menu for your database cluster. If an Upgrade Database option is present, an upgrade is required. To upgrade your database cluster:- Click the ”…” menu
- Select “Upgrade Database”
- Confirm the upgrade
Maintenance window
For critical security fixes, Laravel Cloud may need to apply updates to your database cluster during its maintenance window.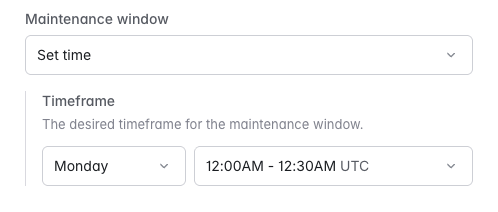
- Click the ”…” menu
- Select “Edit settings”
- Select “Set time” in your maintenance window dropdown
- Select a day and a timeslot (UTC)
Binary logs and storage usage
Your database’s storage figure covers more than your tables. MySQL writes a binary log, an ordered record of every change made to your data, and those files live on the same volume as the data itself. Laravel Cloud reports the two together as a single storage number. Binary logs are what make replication and point-in-time recovery possible, so they are not optional. They do mean that a database can grow toward its storage limit even when the amount of data you are storing has not changed. A write-heavy workload produces binary log volume out of proportion to the rows that end up stored, so a queue table churning through jobs or a repeated bulk import can leave the storage figure well above the size of your tables. How binary logs are cleaned up You do not need to manage this. Two mechanisms keep binary logs from filling your volume:- Scheduled rotation. Binary logs are retained for roughly 8 days, then removed automatically.
- Emergency cleanup. Disk usage is checked every minute. If a volume passes 90% used, all but the most recent binary log is cleared immediately.
- A scheduled rotation or an emergency cleanup releases space, and usage drops.
- A busy period pushes usage back up as new logs accumulate.
- High-churn tables such as queues, sessions, caches, and logs kept in the same database as your application data.
- Batch jobs that rewrite large numbers of rows on a schedule.
- Bulk imports run repeatedly rather than once.
Troubleshooting
Common error messages
Too many connections error
Connection timeout error
- If your database scales to zero, a query against a sleeping database may take slightly longer while the database wakes. This is expected, adds only a few hundred milliseconds, and should not trigger this error.
- If this message appears constantly, confirm you have plenty of disk space and allow 15 minutes for the database to restart after changing disk space limits.
- Check notifications to be alerted before reaching these limits.
- If this message appears occasionally, you may need to increase your database RAM, as the database likely hit an out-of-memory error and restarted during a query or connection burst.
- Contact support if issues persist.
Performance monitoring
Monitor your database performance in the Metrics section of your database cluster page. Watch for:- High CPU usage: May indicate inefficient queries or insufficient compute resources
- High memory usage: Could lead to connection issues or query failures
- Low disk space: Can cause database failures and connection timeouts
Enable notifications in your organization settings to receive alerts before reaching resource limits.