Introduction
Background jobs allow your application to defer slow or expensive work (such as sending email, generating PDFs, calling external APIs, or processing media) so that your application can respond to web requests quickly.- Laravel
- Symfony
Laravel Cloud offers several ways to process queued jobs. Managed queues are the recommended option for most production and development workloads. Laravel Cloud will provision the queue, run workers on dedicated instances, and automatically scale them based on the work waiting to be processed. For applications that need a different queue driver, you may instead run the 
Each managed queue corresponds to a single Laravel queue name and is provisioned in the region of the environment it belongs to. The name you give the managed queue must match the 
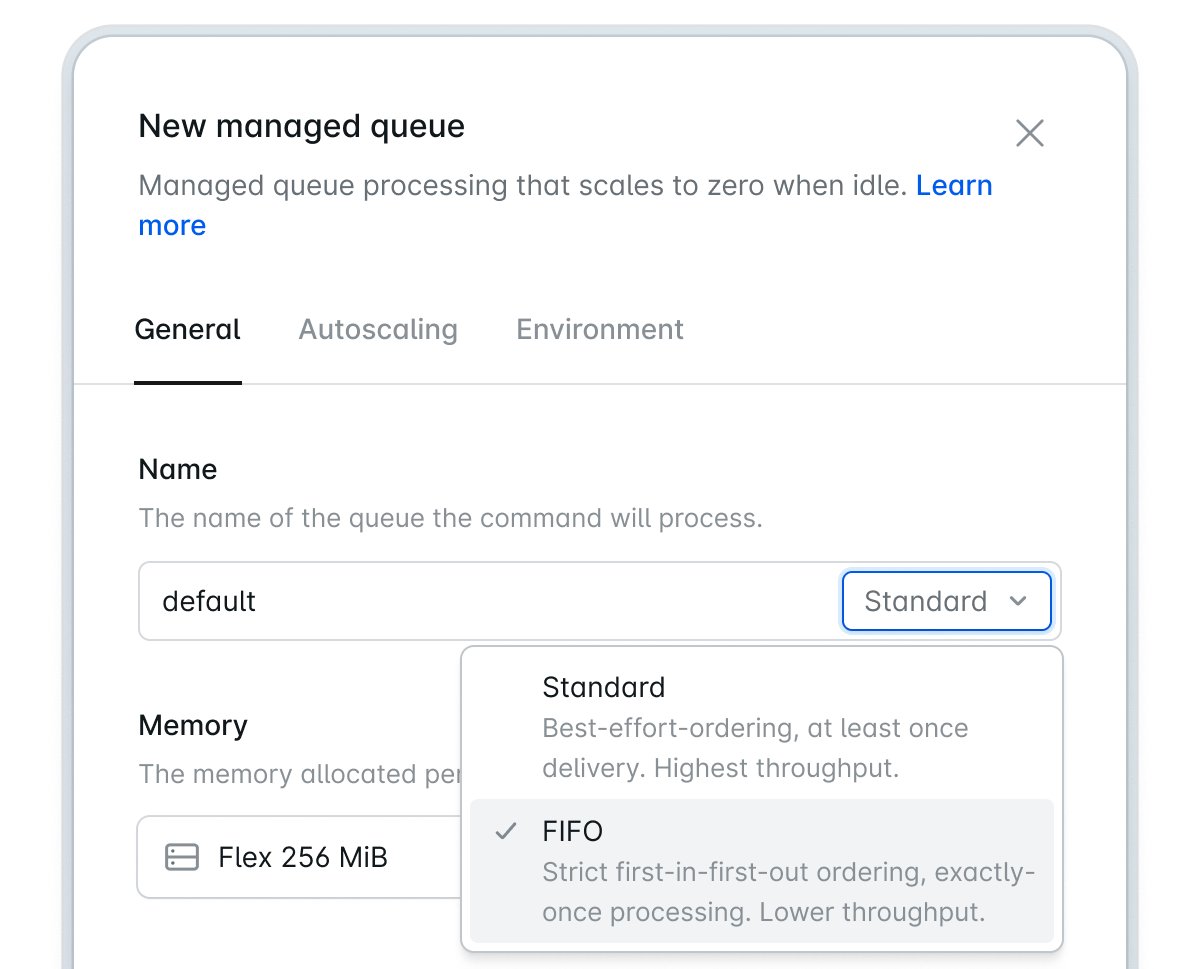
Standard queues deliver jobs at least once with best-effort ordering and support per-job delays of up to 15 minutes. They are the right choice for the vast majority of background work.FIFO queues deliver jobs in the exact order they were dispatched and deduplicate jobs on arrival. They are designed for order-sensitive workloads such as payment processing and ledger updates. FIFO queues run in high-throughput mode automatically, their operations are billed at a small premium (see Pricing), and they do not support per-job delays, so delayed jobs belong on a standard queue.When you create a FIFO queue, Laravel Cloud appends the 
Once you save and deploy, Laravel Cloud will create the underlying queue, configure access from your application, and start the worker pool. Your application may begin dispatching as soon as the deployment completes. Note that creating a managed queue changes the environment’s default queue connection. See Queue connection.Queue names must contain only letters, numbers, hyphens, and underscores, and must be 43 characters or fewer, including the 
The maximum number of workers a single queue may scale to depends on your plan:
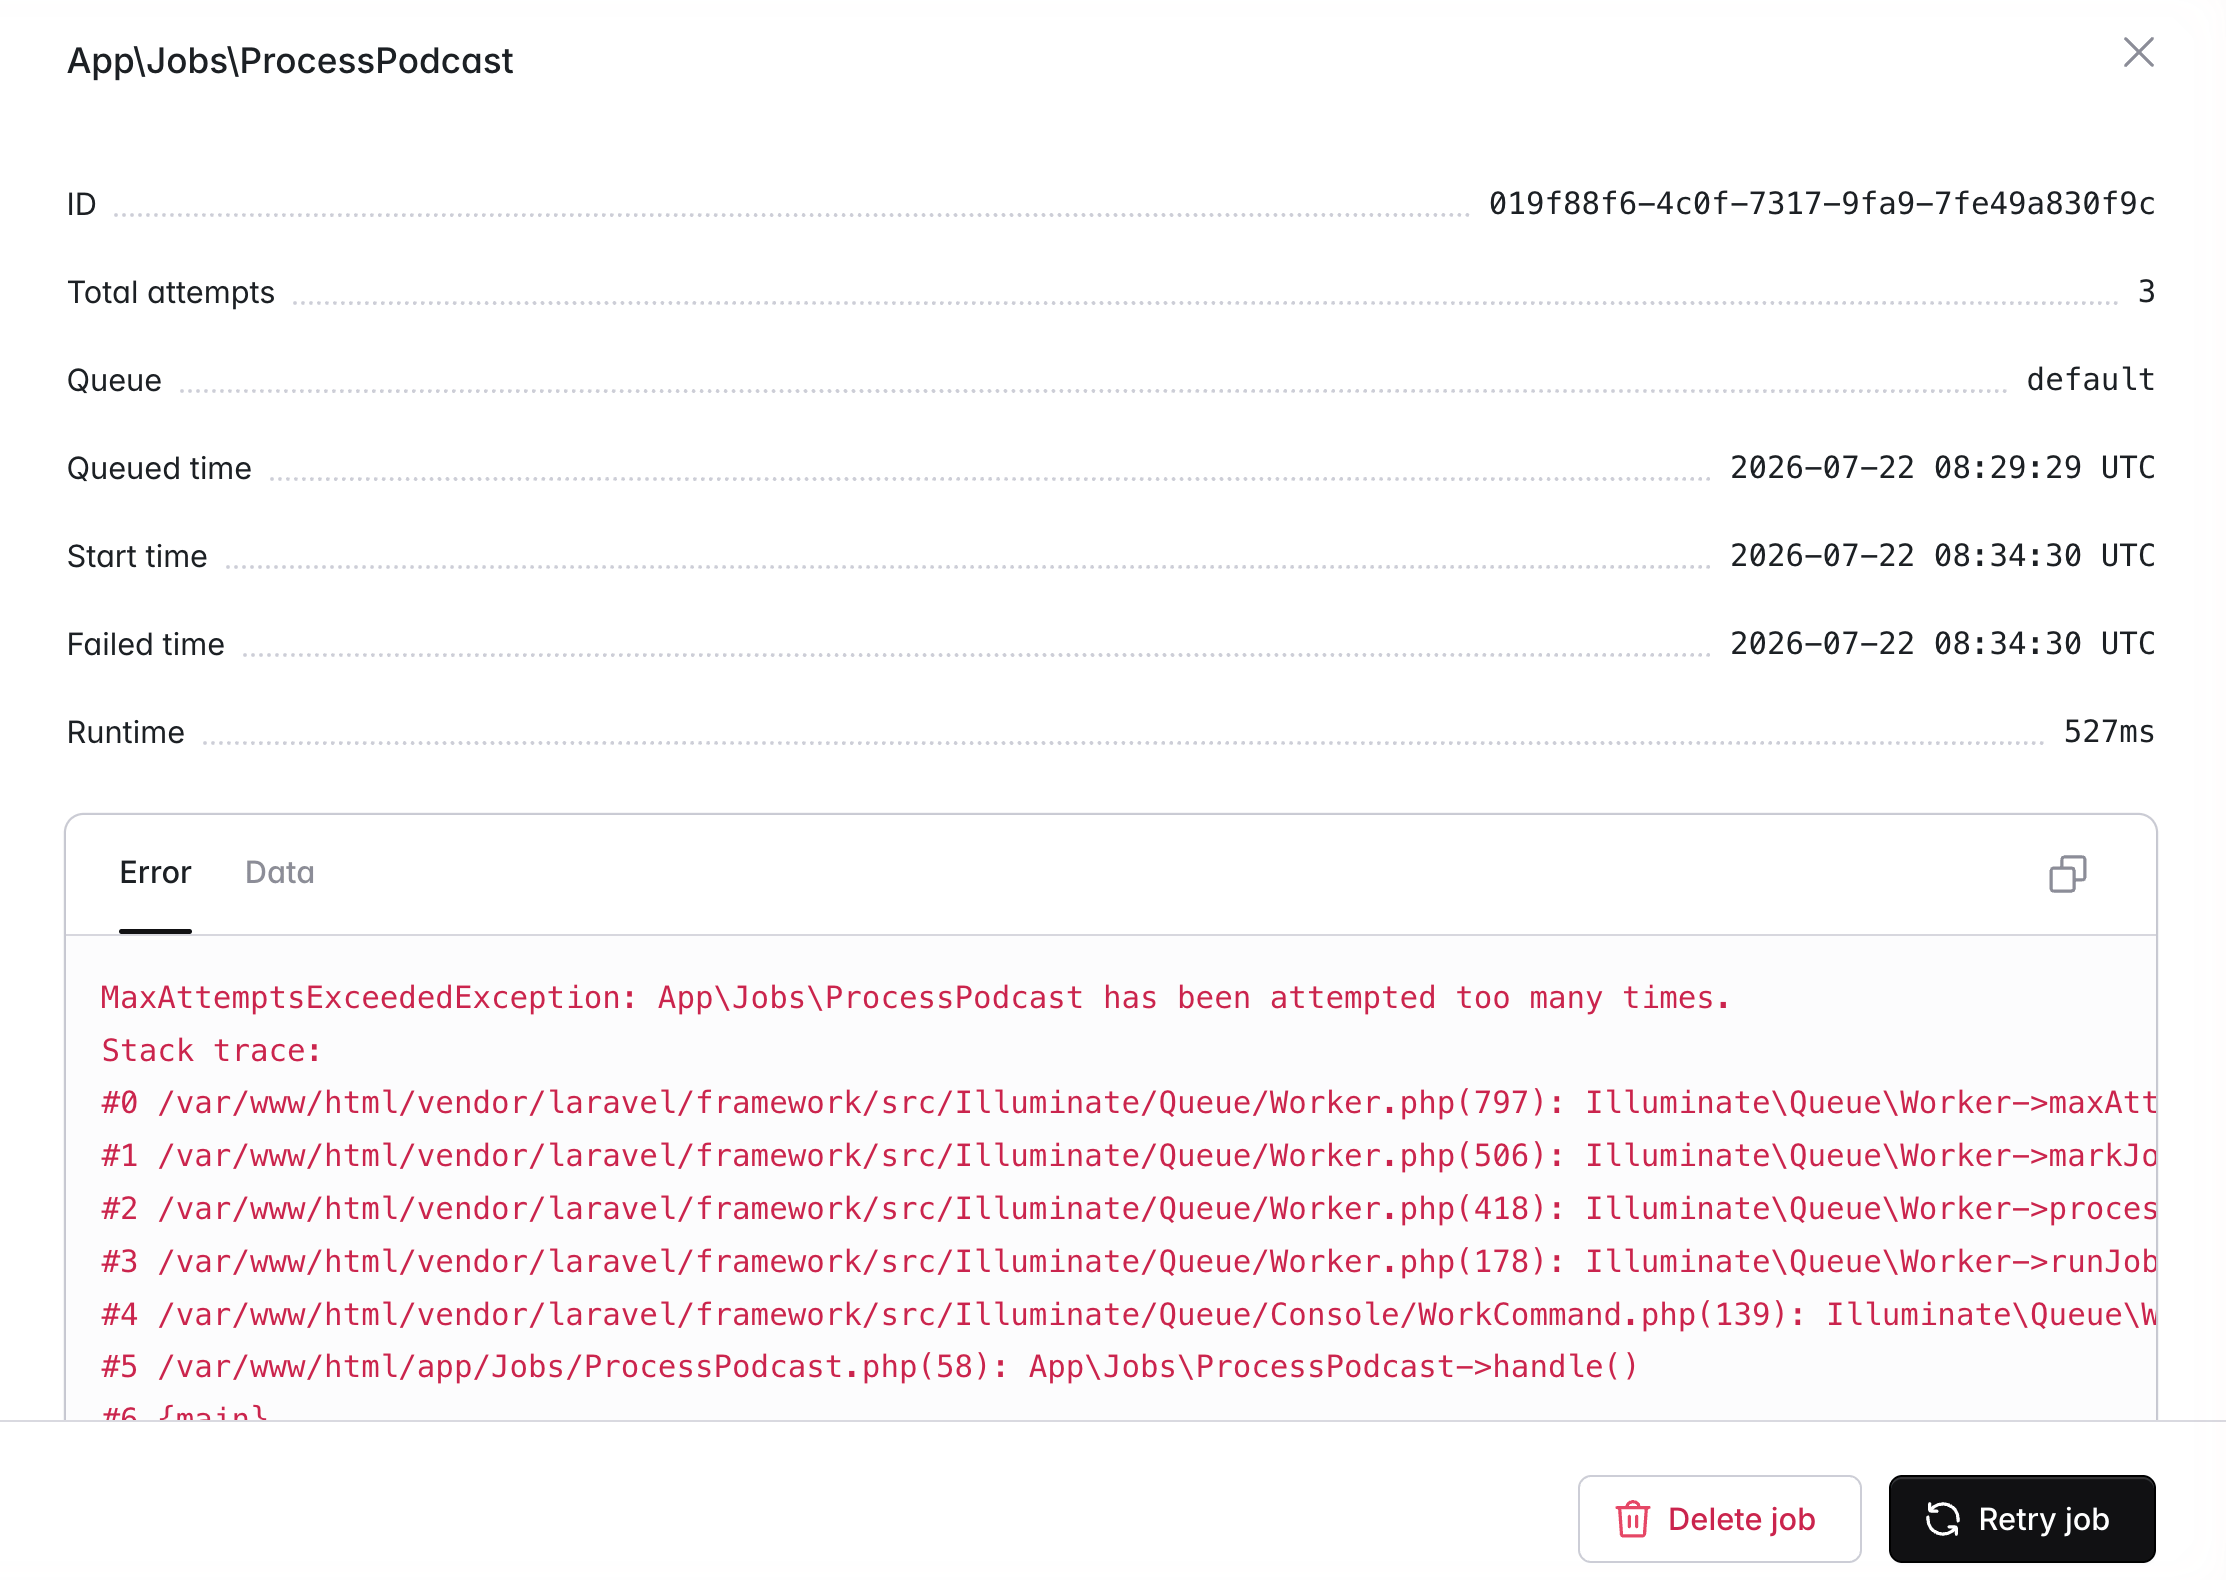
When a job fails after exhausting its retries, it is recorded in the Failed jobs section automatically; there is no failed jobs driver to configure. Inspect a failure to view its payload, exception, and stack trace, then retry or delete it, individually or in bulk. The Laravel Cloud API provides the same list, retry, and delete operations so you can automate failure handling. Retries and deletions require edit access to the environment.
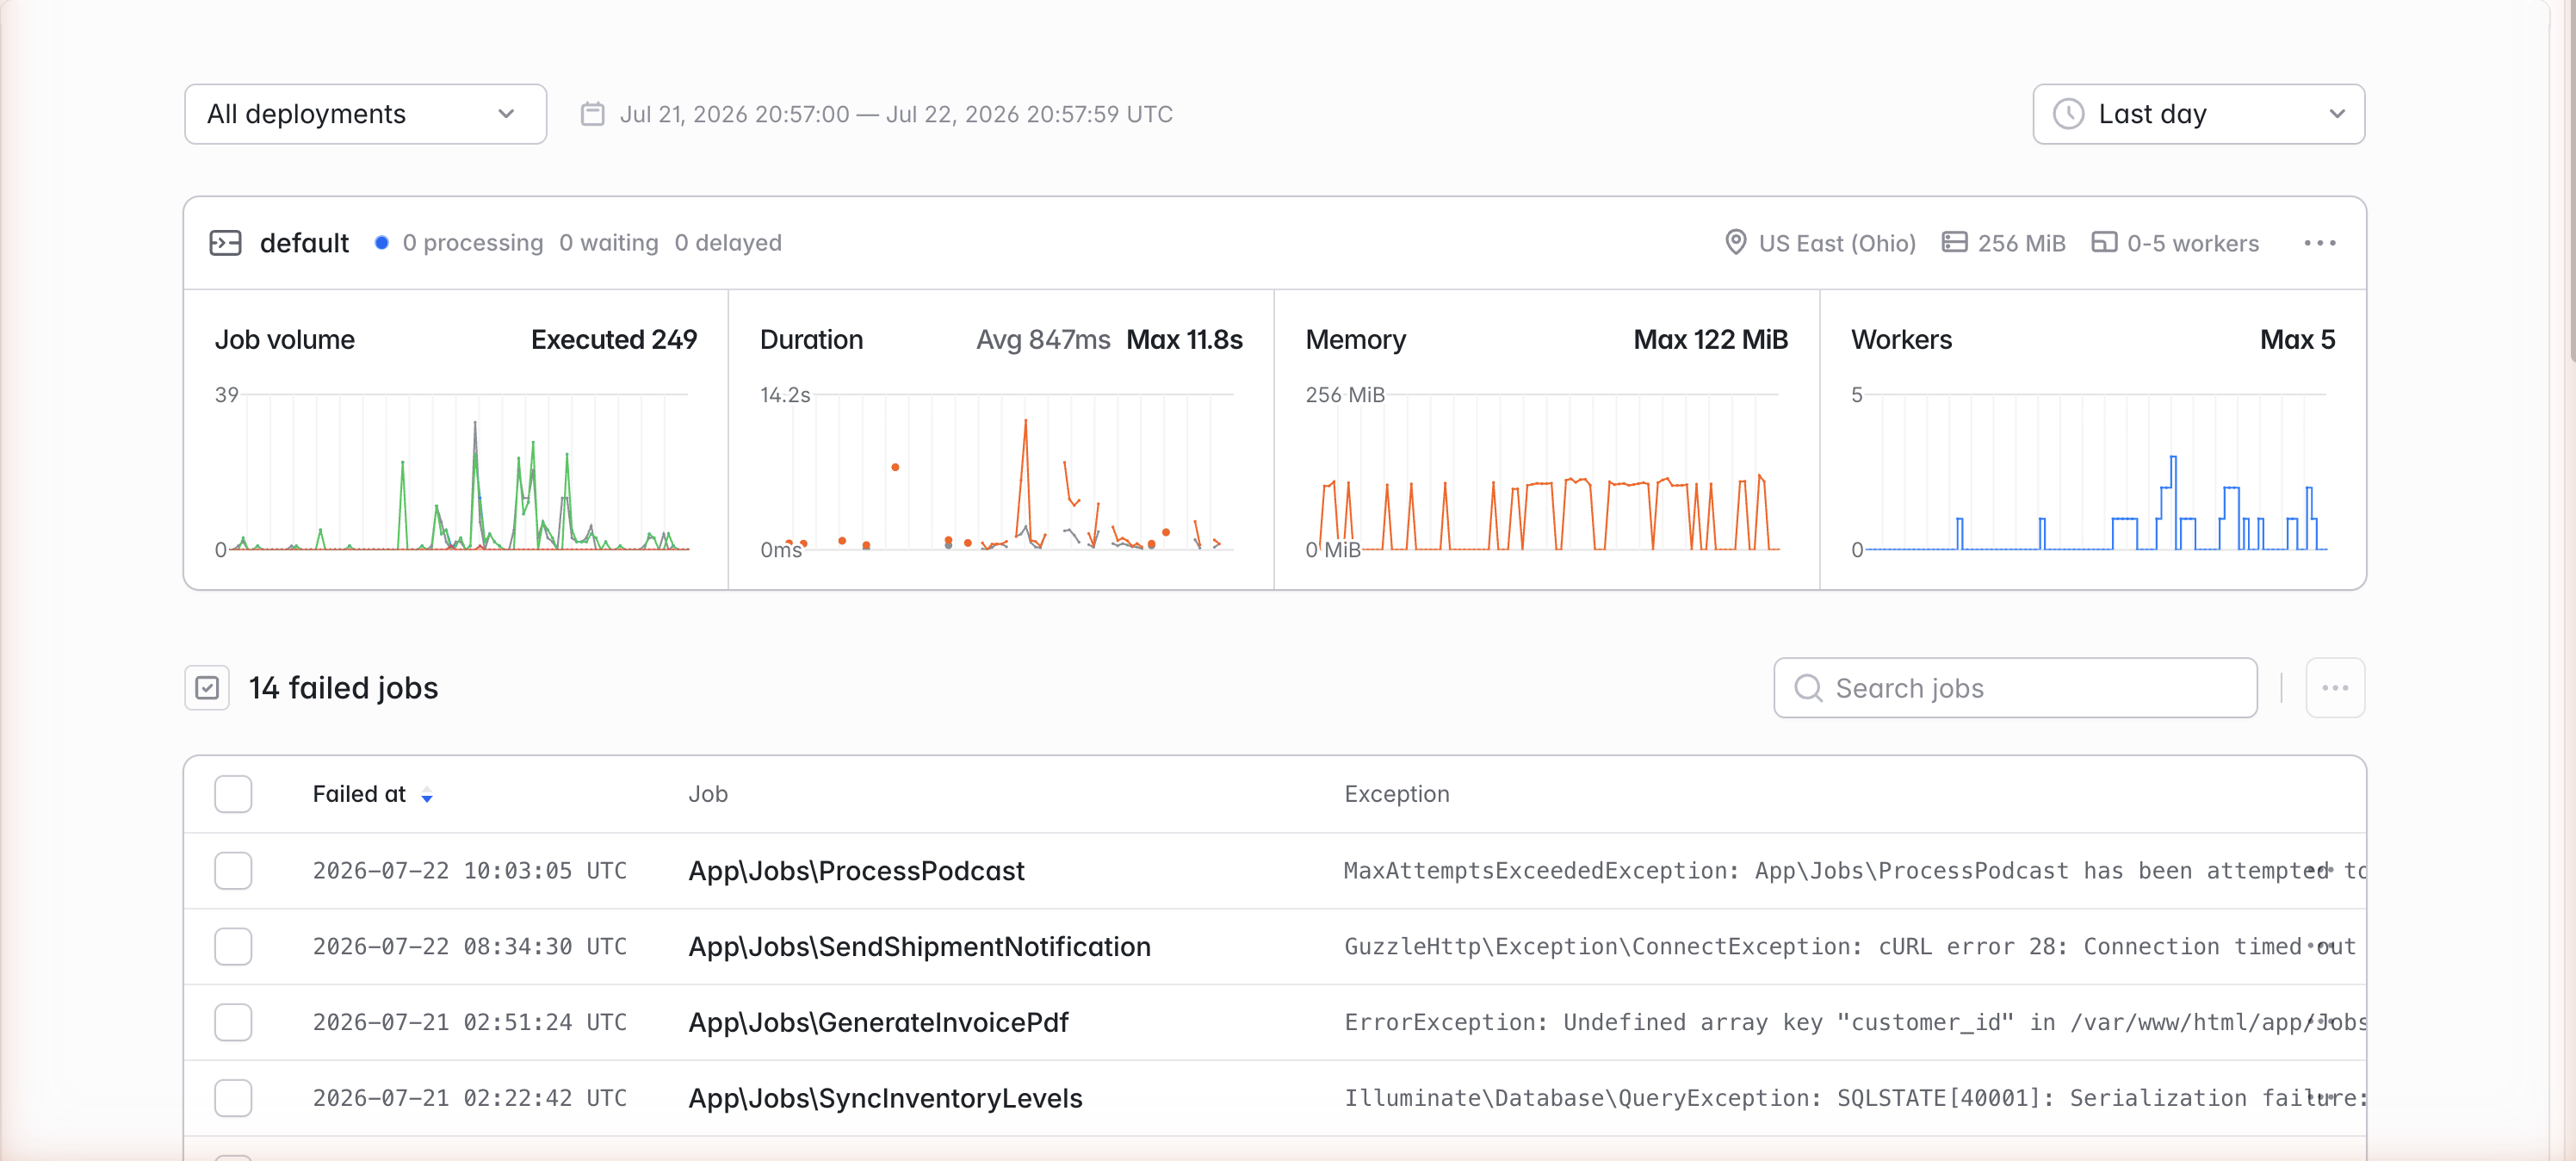
Worker log output is sent to the environment’s Logs tab alongside your web application’s logs, and managed queue metrics live on the Queues tab only, not the environment-level Metrics tab.


queue:work Artisan command directly on a worker cluster or as a background process on your app cluster.Choosing your queue setup
Managed queues are the right choice when you want background jobs isolated from your web traffic, want to pay only while jobs are actually being processed, and want failed jobs visible without running queue infrastructure yourself. Worker clusters are useful when you want to self-manage your
queue:work processes and your queue driver using a database, cache, or other driver type.App cluster background processes are acceptable for development, low-volume workloads, and small applications. For production workloads with meaningful job volume, we recommend managed queues so that background processing does not compete with web traffic for CPU and memory.Managed queues
Managed queues give your application a fully managed queue with dedicated workers that automatically scale based on the work waiting to be processed. Each managed queue is independent, with its own queue, pool of workers, memory allocation, and worker autoscaling range. When jobs arrive on an idle queue, Laravel Cloud will wake workers in under a second to process them. When the queue drains, Flex workers scale back down to zero, so you only pay for compute when your jobs are actually being processed. Queues that need strict ordering can be created as FIFO queues, and workloads with long-running jobs or steady throughput can run on the always-on Pro compute class.
queue value your application dispatches to, unless the queue is designated as the environment’s default. Multi-region applications that need queue isolation per region should create a managed queue in each environment.How many managed queues you may run depends on your plan. The allowance is per environment, not per organization, so each environment gets its own quota. The limits are as follows:Getting started
1
Update your framework
Managed queues require Laravel 11.55.0, 12.63.0, 13.19.0, or newer, with
aws/aws-sdk-php in your composer.json. Symfony applications are supported via laravel/symfony-on-cloud.2
Create a managed queue
Open your environment, click Add compute on the canvas toolbar, then Managed queue. Give the queue a name, then choose the queue type, the memory size, and the worker autoscaling range.
3
Deploy
Deploying provisions the queue and sets
QUEUE_CONNECTION=cloud, so your application dispatches to it without further configuration. Dispatch a job and watch it process on the environment’s Queues tab.How scaling works
Laravel Cloud continuously measures the work on each managed queue, both the jobs currently being processed and the jobs waiting to be picked up, and sizes the worker pool within your configured autoscaling range: it keeps busy workers at a healthy utilization, adds workers when a backlog forms so that waiting jobs are picked up within seconds, and does not add workers beyond the configured minimum unless work requires them. When the queue drains, workers scale back down gradually to avoid churn during short lulls, and Flex queues scale all the way to zero.Because Laravel Cloud delivers every job to your workers itself, it measures real job durations and queue depth rather than guessing from CPU or memory, so there is nothing to tune in the continuous scaler: the autoscaling range is its only control. A sudden burst of thousands of jobs will be absorbed automatically, while an idle Flex queue accrues no compute charges at all. Laravel Cloud continuously improves the scaling algorithm, so the exact scaling behavior may be tuned over time.Compute classes
Every managed queue runs on one of two compute classes, chosen when the queue is created.Flex
Scales to zero when idle and wakes in under a second. The default class, and the right choice for spiky or idle-heavy workloads.
Pro
Always on, with larger sizes and no fixed limit on job runtime. Best for steady throughput and long-running jobs.
Pro sizes are priced at a 20% premium over the equivalent Flex size. For per-size pricing in every region, see Managed queues pricing.Flex is the right default for most applications. Workers wake in under a second when jobs arrive, so even latency-sensitive workloads rarely need to keep workers warm. Pro keeps at least one worker running at all times, so jobs are picked up with no wake time at all, and its always-on worker is billed continuously. Choose Pro when your queue processes jobs longer than 90 seconds, sustains steady throughput around the clock, or needs more than 2 GiB of memory per worker.Flex is available on every plan. Pro is available on the Growth and Business plans. Dedicated variants of both classes, with Pro sizes up to 16 GiB, are available to Enterprise customers running on Private Cloud.
Queue types
Each managed queue is created as either a standard queue or a FIFO queue. The queue type is chosen at creation and cannot be changed afterward.
.fifo suffix to the queue name, so a FIFO queue named orders becomes orders.fifo and your application dispatches to that name. The suffix keeps the names distinct, meaning a standard orders and a FIFO orders.fifo may exist side by side in the same environment. It is also why an existing queue cannot be converted: the type is part of the name. To adopt FIFO for an existing workload, create a new FIFO queue and update your application to dispatch to it.Creating a managed queue
To create a managed queue, open an environment within Laravel Cloud and click Add compute on the canvas toolbar, then Managed queue. You will be prompted to provide a queue name, the queue type, the amount of memory to allocate to each queue worker, and the worker autoscaling range. That is the entire configuration. Laravel Cloud manages job pickup, visibility timeouts, and scaling behavior automatically.
.fifo suffix on FIFO queues. Each managed queue handles exactly one queue name; to process multiple queues, create a separate managed queue for each.Queue connection
When you deploy a managed queue, Laravel Cloud setsQUEUE_CONNECTION=cloud for the environment. This makes managed queues your application’s default queue connection.If you want some jobs to keep using your previous driver (for example, while trialing a single managed queue alongside an existing worker cluster), explicitly set QUEUE_CONNECTION back to that driver (database, redis, etc.) and dispatch your managed-queue jobs on the cloud connection explicitly using ->onConnection('cloud').Laravel applications default to the database driver, so applications using the default are the most likely to be affected. Applications that already set QUEUE_CONNECTION=redis (or another explicit value) already override Laravel’s default connection and are less likely to be affected.Setting a default queue
One managed queue in each environment acts as the default. The first managed queue you create becomes the default automatically. When an environment has more than one managed queue, you may change which queue is the default by choosing Set as default from a queue’s dropdown menu on the canvas, or via the Laravel Cloud API.The default queue receives any job dispatched without an explicit queue name. For example,dispatch(new SendEmail) will route to the default managed queue rather than to a queue literally named “default”. This is useful when you have a single managed queue: simply name it according to your team’s conventions and dispatch without ->onQueue('...') calls. You may also rename the default queue without updating any of your application’s dispatch code.Memory allocation
Each managed queue worker runs on an instance with a configurable amount of memory, and CPU scales proportionally with the memory size. Flex queues offer sizes from 256 MiB to 2 GiB. Pro queues offer sizes from 256 MiB to 8 GiB, with more vCPU on the largest sizes. The default is 256 MiB, which is sufficient for typical Laravel jobs such as sending email, dispatching or processing webhooks, updating records, and light data transformation.The classes and sizes available depend on your plan:Heavier workloads, such as jobs that process big files, generate complex reports, or run ML inference, will benefit from the larger sizes. If you have queues with substantially different resource needs, give each its own managed queue with appropriately sized workers.If a job exceeds its worker’s memory allocation, the worker is restarted and the in-progress job is redelivered to another worker automatically. An occasional restart is harmless, but if they recur, check the Memory chart on the Queues tab: memory consistently near 100% means the queue needs a larger size.
Managed queue instance sizes are managed separately from the sizes available to app and worker clusters. Each managed queue worker is sized independently, by memory. Queues created before Flex and Pro were introduced keep their original size and pricing, even if that size is no longer offered.
Worker autoscaling
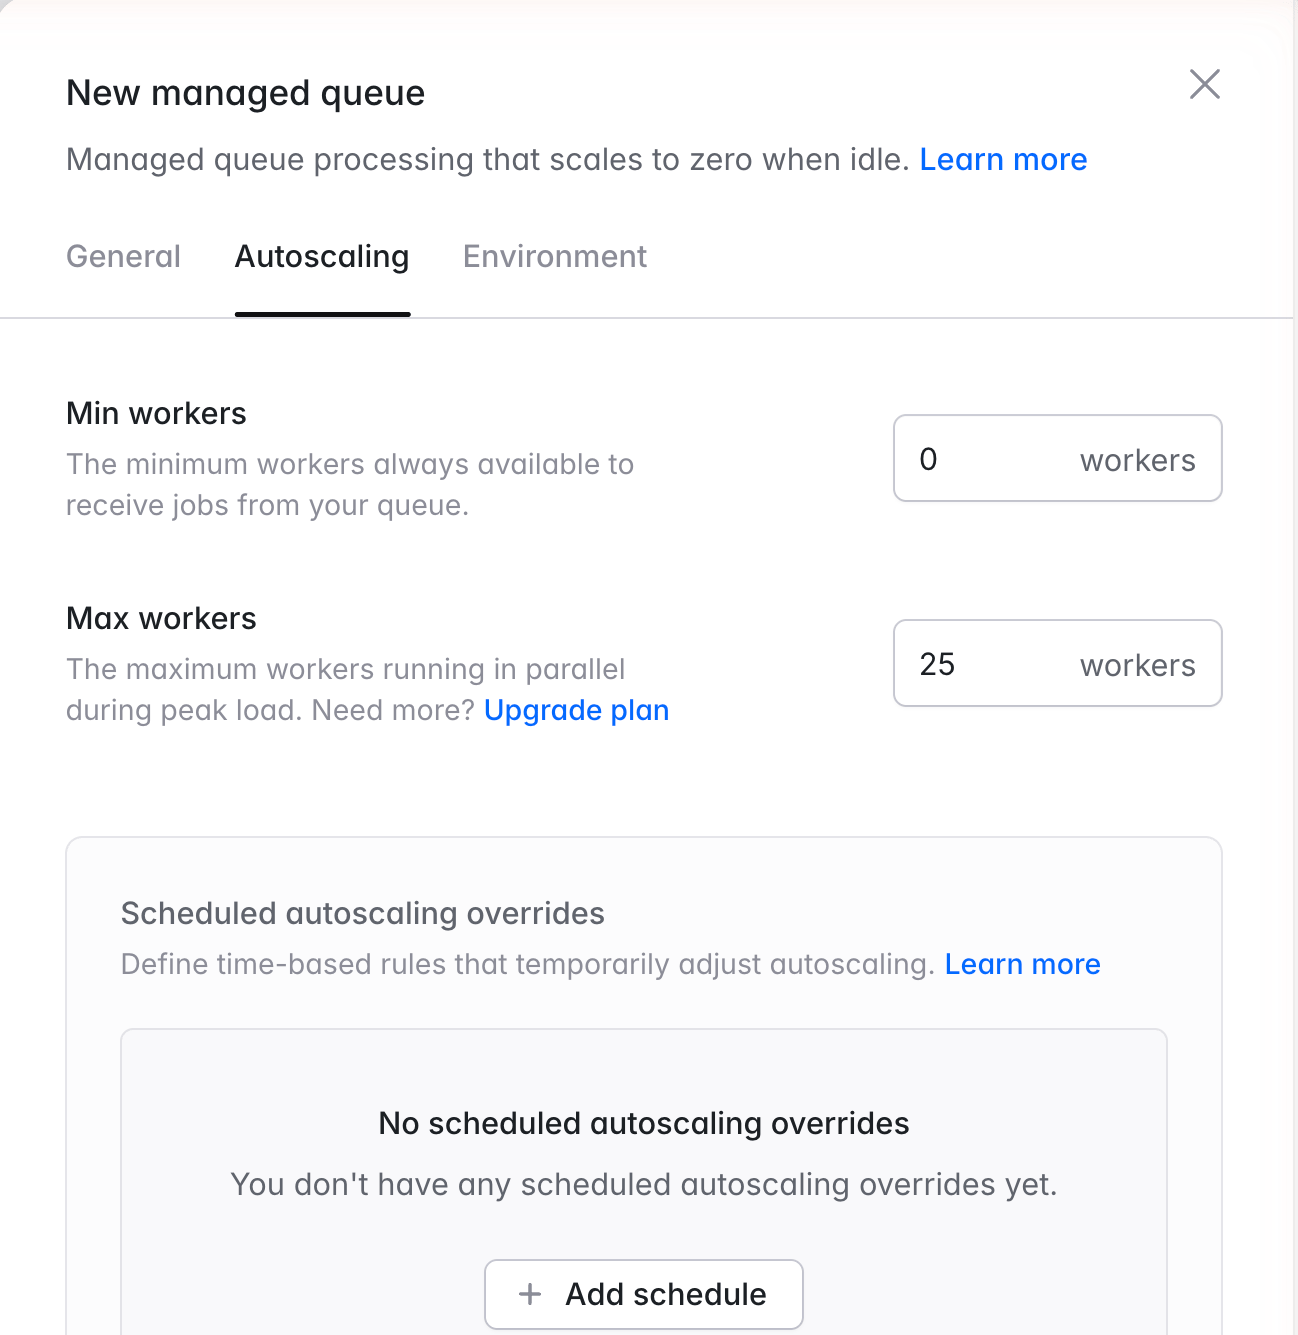
Each managed queue scales between a configured minimum and maximum number of workers. Flex queues may set the minimum to zero, so that no workers run (and nothing is billed) while the queue is idle. Pro queues keep a minimum of at least one worker so that jobs are always picked up immediately. You may also raise the minimum on any queue to hold a baseline of workers for a steady flow of jobs.
Choosing a maximum is a function of how much parallelism your downstream systems can tolerate, since workers processing in parallel will hit your database, third-party APIs, and other shared resources concurrently. Typically, you should start conservative, verify your downstream dependencies can absorb the load, and raise the cap when high-volume bursts such as CSV imports or webhook storms need to drain quickly.
Scheduled autoscaling
Managed queues support scheduled autoscaling overrides, which temporarily change the queue’s minimum and maximum workers on a one-time or recurring schedule. If a nightly import dispatches a large batch of jobs at midnight, you may schedule a higher minimum just before it so that workers are already running when the jobs arrive. Overrides follow the same scheduling rules as scheduled autoscaling for compute clusters.Advanced settings
Organizations with the advanced managed queues entitlement will see an Advanced tab when configuring a queue, exposing overrides for the visibility timeout and graceful shutdown timeout. Managed queues handle both automatically, and most applications should never need to change them. The overrides are useful mainly for queues whose jobs run for hours at a time. If that sounds like your workload, contact support.How jobs are processed
Laravel Cloud long-polls each managed queue on your application’s behalf and delivers jobs directly to workers. Jobs are typically picked up within milliseconds while workers are running, and in under a second when a Flex queue wakes from zero. There is no polling interval to configure and no tradeoff between pickup latency and operations cost to manage.While a worker processes a job, Laravel Cloud extends the job’s visibility timeout in three-minute increments for as long as the job keeps running, so a long-running job is not redelivered mid-run. In practice, these extensions matter for long-running jobs on Pro queues, since jobs on Flex should complete within 90 seconds. If a worker crashes or is terminated, the job becomes visible again and is retried on another worker. As with any queue that provides at-least-once delivery, your jobs should be designed to tolerate being processed more than once.There is no fixed limit on how long a job may run. Laravel Cloud continues extending a job’s visibility for as long as the job is processing. The queue’s compute class instead governs what happens when a worker must stop, for example during a deployment, a scale-down, or an interruption of the underlying instance: the worker is given a grace period to finish its current job of 90 seconds on Flex or 1 hour on Pro. A job that exceeds the grace period when its worker stops is terminated and redelivered. Since Flex workers run on capacity that may be interrupted at any time, queues that process jobs longer than 90 seconds should run on the Pro class.Filesystem
Each managed queue worker has its own ephemeral filesystem, sized in proportion to the worker’s memory: as with your environment’s filesystem, every 1 GiB of memory provides 512 MiB of disk. If a job needs more temporary disk space, for example when transforming large files, select a larger memory size.Treat the filesystem as temporary, unshared disk space that is only consistent during a single job. Files are not guaranteed to persist from one job to the next, and the filesystem is reset whenever a worker is replaced. For persistent file storage, use thes3 driver via Laravel Object Storage.Observability
Every environment with managed queues has a dedicated Queues tab surfacing near real-time status and historical metrics for every managed queue (job volume, processing duration, memory usage, and active workers), along with a cross-queue view of failed jobs. You may scope the page using the deployment and time range filters.

Pausing and purging
To stop a managed queue from processing, for example during an incident or a downstream maintenance window, pause it from the queue’s dropdown menu on the canvas. When paused, Laravel Cloud stops polling and scales the workers to zero, allowing in-flight jobs to finish gracefully, and no worker or polling charges accrue. Jobs your application dispatches continue to land in the queue and are held until you resume, at which point Laravel Cloud notices the backlog and scales workers up to process it. Thequeue:pause Artisan command is not supported for managed queues; pause the queue within Laravel Cloud instead.To clear a queue’s contents, purge it from the same dropdown menu. Purging removes every job in the queue immediately and cannot be undone. Pausing and purging require edit access to the environment.Preview environments
Managed queues are supported in preview environments. Each preview environment receives its own queue and workers, isolated from production and other preview branches, and billed in the same way as production usage.Pricing
Managed queues are billed on two metrics that appear separately on your invoice.Workers are billed per second by compute class and memory size, with no monthly cap. Flex workers are billed only while they are running, so a Flex queue at rest accrues no worker charges at all. For example, a Flex queue that runs three workers for 20 minutes will be billed for 3,600 worker-seconds at the configured memory size, and nothing more. Pro queues keep a minimum of one worker running at all times, and that worker is billed continuously. Pro sizes are priced at a 20% premium over the equivalent Flex size.Queue operations are billed at $1 per 1 million operations on standard queues and $1.10 per 1 million operations on FIFO queues. An operation is a job lifecycle event: dispatching a job, starting it, and deleting it upon completion each count as one operation, so a typical successful job costs three operations. Long-running jobs record an additional visibility extension operation periodically while they run, and a job that is released back to the queue for retry records additional operations for each attempt. Laravel Cloud also long-polls each queue on your application’s behalf; this polling baseline amounts to roughly $0.13 per month for an active queue and winds down when a queue has been inactive for an extended period.In practice, payload-bearing operations (dispatches and starts) are measured in 64 KB chunks, so a job whose payload exceeds 64 KB will count as multiple operations for those events. Most Laravel jobs have a payload well under 64 KB. The maximum payload size for a job is 1 MiB.Both metrics appear on your environment’s Usage page, broken down by queue.For detailed pricing information, see Managed queues pricing.Requirements
Your application must include theaws/aws-sdk-php package in its composer.json. Deployments that create or update a managed queue without it will fail at deploy time with a clear error.Managed queues require a recent version of the Laravel framework. The supported minimums are Laravel 11.55.0, Laravel 12.63.0, and Laravel 13.19.0. Laravel Cloud reads your application’s composer.lock at deploy time, so a framework upgrade takes effect on the first deployment after you update the framework. Symfony applications are supported out of the box via laravel/symfony-on-cloud.No additional credentials, configuration, or setup are required on your side. Laravel Cloud will provision the queue, configure access, and manage the underlying infrastructure on your behalf.Upgrading from earlier managed queues
The original release of managed queues included three settings to tune: a polling interval, a visibility timeout, and a shutdown timeout. The latest generation removes them and manages all three automatically. It also picks up jobs in under a second instead of several seconds when scaling from zero, and adds FIFO queues, the Pro compute class, and configurable minimum workers.Upgrading a queue takes three steps: update the framework to a supported version (Laravel 11.55.0, 12.63.0, 13.19.0, or newer) withcomposer update laravel/framework and commit the updated composer.lock; choose a new Flex or Pro size in the queue’s settings; and deploy. Updating the framework alone does not change your queues. Each queue keeps the previous runtime, along with all of its settings, until you switch its size, so nothing changes until you choose to upgrade it.After a queue is upgraded:- The polling interval, visibility timeout, and shutdown timeout settings no longer appear. This is expected. Job pickup and visibility are managed automatically, and the shutdown grace period is now a property of the queue’s compute class.
- Failed jobs carry over untouched.
- The queue cannot return to the previous runtime.
Limitations
Standard managed queues provide at-least-once delivery with best-effort ordering. Workloads that require strict ordering should use a FIFO queue.Each managed queue handles exactly one Laravel queue name. To process multiple queues, create a separate managed queue for each.Jobs cannot be delayed for more than 15 minutes on standard queues, and FIFO queues do not support per-job delays at all.Jobs on the Flex class should complete within 90 seconds. Longer jobs belong on the Pro class, which has no fixed runtime limit and gives workers a 1 hour grace period to finish their current job whenever a worker must stop.Laravel Horizon does not support managed queues, since Horizon requires a Redis-backed queue. The built-in Queues tab provides metrics, failed job visibility, and retries instead. Similarly, thequeue:failed, queue:retry, and queue:clear Artisan commands are not currently supported for managed queues; use the dashboard or the Laravel Cloud API to manage failed jobs.Migrating from queue clusters
Queue clusters are deprecated, and new queue clusters cannot be created. Existing queue clusters will be sunset on September 30, 2026, and we strongly recommend migrating any production queue clusters to managed queues or worker clusters well before then.To migrate, create a managed queue in the same environment using the same queue name your application currently dispatches to. Allocate memory appropriate for the workload currently running on the queue cluster. If your queue cluster has been comfortably handling its jobs, a similarly sized memory allocation is a reasonable starting point. Set the maximum worker count based on the parallelism your downstream systems can tolerate. Queue clusters and managed queues scale differently, so do not carry over the queue cluster’s worker count blindly.Once you deploy the environment, the managed queue will be provisioned. Verify that jobs are flowing through the new queue by dispatching a test job and watching it process in the Queues tab. Then, stop dispatching to the old queue cluster, wait for its remaining jobs to finish, and delete it from your canvas. If your application dispatches to multiple queue names through a single queue cluster, repeat this process for each queue name.Worker clusters
Running your application’s queue workers on a dedicated worker cluster, rather than on the app cluster that handles incoming HTTP traffic, allows you to scale queue processing independently of your web traffic. Worker clusters are useful when you want to self-manage yourqueue:work processes and your queue driver using a database, cache, or other driver type.To add queue workers to a dedicated worker cluster, first create the worker cluster. Then, click on the Worker compute cluster within the infrastructure canvas dashboard. Within the Background processes section of your cluster settings, click New background process. Next, configure your queue worker options based on your environment’s requirements and select the number of queue:work processes within the given configuration that you would like to create. Finally, save and deploy your environment changes to start your queue worker.App cluster background processes
The simplest way to begin processing queued jobs is to add a queue worker background process to your environment’s app compute cluster. When running queue workers on your app compute cluster, queued jobs will be processed on the same compute instances that handle your application’s incoming HTTP traffic. This is well suited to development, low-volume workloads, and small applications. For production workloads with meaningful job volume, prefer managed queues so that background processing does not compete with web traffic for CPU and memory.To get started, click on your environment’s App compute cluster within the infrastructure canvas dashboard. Then, within the Background processes section of your cluster settings, click New background process. Next, configure your queue worker options and the number ofqueue:work processes you want to run. Finally, save and deploy your environment changes to start the worker.

When running queue workers via Laravel Cloud, there is no need to run the
queue:restart Artisan command after each deployment.Queue clusters (deprecated)
Queue clusters runphp artisan queue:work in a fully isolated cluster whose sole purpose is running and scaling queue worker processes based on job latency and queue pressure. If you have an existing queue cluster, it will remain visible within your environment’s infrastructure canvas and continue processing jobs until the sunset date.Custom background processes
In addition toqueue:work processes, Laravel Cloud also allows you to configure arbitrary long-lived custom background processes, such as Laravel Horizon.To get started, click on a compute cluster within your environment’s infrastructure canvas dashboard. Then, within the Background processes section of your cluster settings, click New background process. Next, click the Custom worker tab and provide your custom worker command along with the number of instances of the command that should be started. For example, for Laravel Horizon, you should provide the php artisan horizon command and specify that Laravel Cloud should run a single process. Finally, save and deploy your environment changes to start your custom worker process. Laravel Cloud will automatically restart the process if it exits prematurely.