
An MCP server is like a door into your application: it can read user data, write records, call internal APIs, and trigger actions on behalf of a user. Leave that door unlatched and you have a production incident waiting to happen.
This is why authentication is not optional when using your Laravel MCP server. The question is what kind, and how much work it takes to set up (spoiler alert: close to none).
We tried to make the authentication process as easy as possible for Laravel MCP, and in this post, we show you how to set it up along with some security best practices. For more information on the Laravel MCP, here’s a complete guide.
Why Your MCP Server Needs Authentication
The Laravel MCP server (or any MCP) exposes tools that run code. If your tools touch user data, billing records, or any third-party API, you need to know who is calling them before you run a single query.
Without authentication:
- Any process that can reach your server URL can invoke your tools.
- There is no user context to scope queries against. Every tool call sees all data.
- You cannot hide sensitive tools from users who should not see them.
- Rate limiting by user is impossible.
MCP servers built for local use (running on a user's machine over STDIO) get a pass here. They run with implicit trust. But the moment your server is reachable over HTTP by Claude Desktop, Cursor, or any external agent, authentication is required.
The Protocol: OAuth 2.1
The MCP specification mandates OAuth 2.1 for HTTP transport. This is not a Laravel convention or a package opinion. It is baked into the spec.
Here are the key additions relevant to MCP:
- PKCE (Proof Key for Code Exchange) is required. This prevents authorization code interception attacks.
- Dynamic client registration (RFC 7591) is supported, so MCP clients can register themselves without you manually creating credentials for each one.
- Authorization Server Metadata (RFC 8414) and Protected Resource Metadata (RFC 9728) let clients discover your endpoints automatically.
With this protocol, a client like Claude Desktop can connect to a new MCP server, discover its authorization server, register itself, and complete the OAuth flow without any manual configuration on either side.
What Laravel MCP Gives You
The laravel/mcp package implements all of this. One method call registers the discovery, metadata, and dynamic registration endpoints:
That single line handles what would otherwise be several hundred lines of custom OAuth server code. The package enforces PKCE, handles discovery metadata, and wires up dynamic registration. You just need to configure your app. You do not implement the protocol.
Three Ways to Authenticate with the Laravel MCP
Option 1: Laravel Passport (Recommended for External Clients)
Laravel Passport implements the full OAuth 2.1 flow. Use it when third-party MCP clients need to connect to your server. This is the right choice for production.
Install and configure:
Add the trait and contract to your User model:
Register OAuth routes and protect your server in routes/ai.php:
That is the entire setup. Laravel Passport and laravel/mcp handle the rest.
Option 2: Laravel Sanctum (for Controlled Environments)
Laravel Sanctum uses simple bearer tokens. Use it when you control both the client and server.
Generate a token for the MCP client:
The client sends Authorization: Bearer {token} on every request. Start here if you are building an internal tool. Switch to Passport when external clients enter the
picture.
Option 3: Custom Middleware
If you have an existing authentication system—API keys, JWT, a proprietary token format—you can pass any middleware to the ->middleware() call:
As long as your middleware resolves $request->user(), everything downstream works the same way.
Setting Up Laravel Passport for MCP
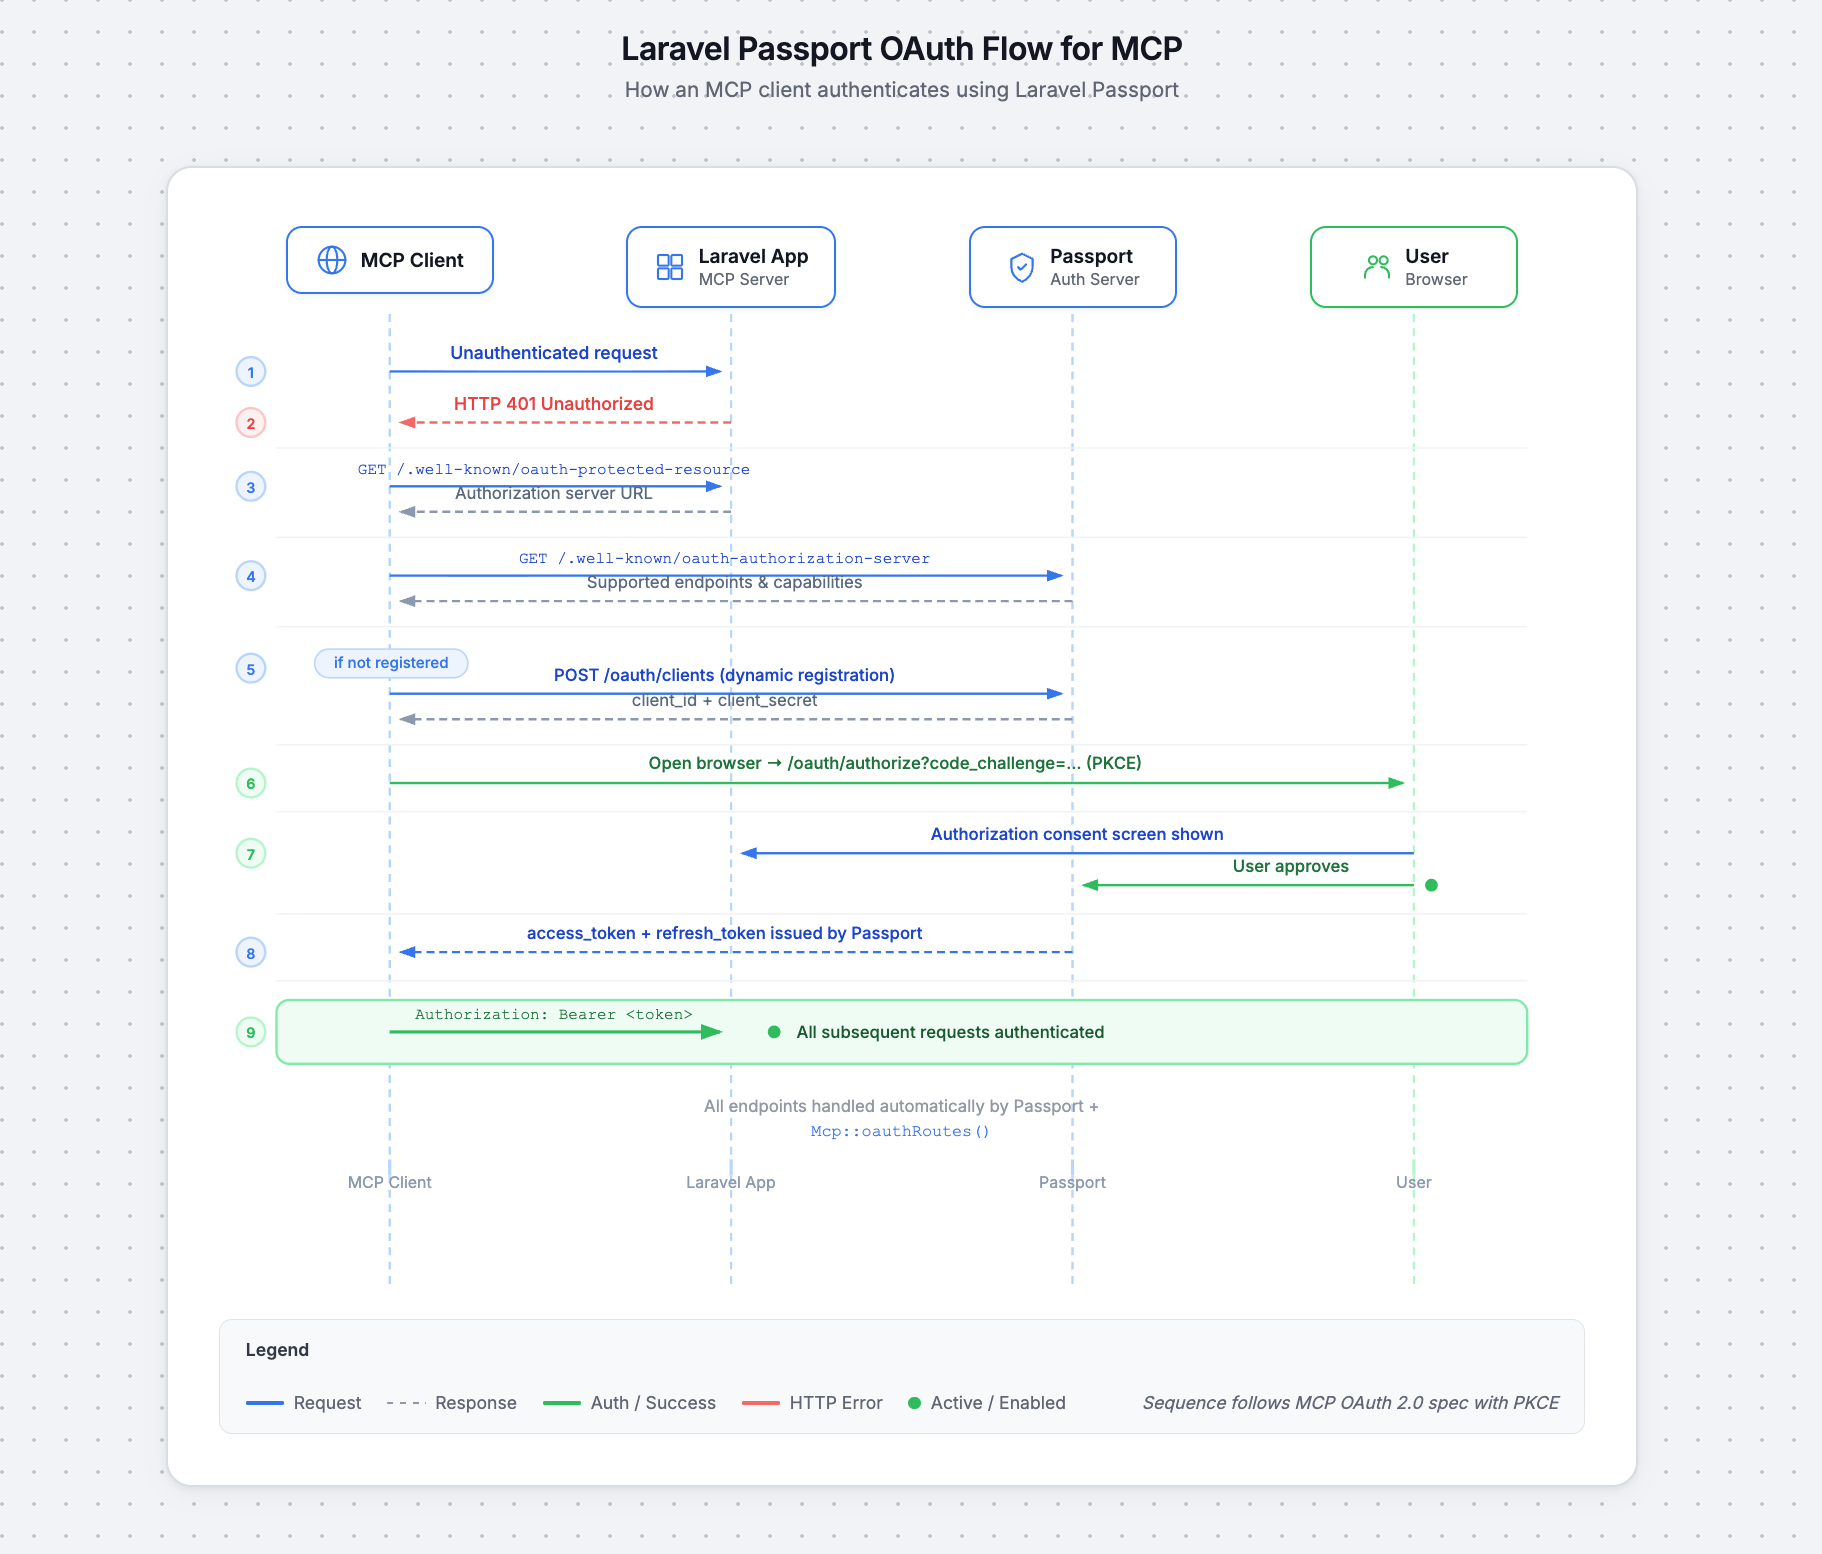
With the Passport configuration above in place, here is what happens when a client connects:
- The MCP client sends an unauthenticated request to your server.
- Your server returns HTTP 401.
- The client fetches
/.well-known/oauth-protected-resourcefrom your app. - The client discovers the authorization server URL and fetches
/.well-known/oauth-authorization-server. - The client dynamically registers itself (if not already registered).
- The client opens the browser to your Passport authorization endpoint with a PKCE challenge.
- Your app shows the authorization view to the user. The user approves or rejects.
- Passport redirects the browser back to the MCP client's callback URL with an authorization code.
- The MCP client exchanges the authorization code and code verifier for an access token (and optionally a refresh token) via
POST /oauth/token.
- The MCP client exchanges the authorization code and code verifier for an access token (and optionally a refresh token) via
- The client includes
Authorization: Bearer <token>on every subsequent request.
All of this is handled by Passport and the Mcp::oauthRoutes() registration. You do not implement any of these endpoints yourself.
Accessing the Authenticated User in Tools
Inside any Laravel MCP tool, $request->user() returns the authenticated User model. Use it to scope data and check permissions:
Note that $request is Laravel\Mcp\Request, not Illuminate\Http\Request. The user access pattern is the same, but the class is different.
Controlling Tool Visibility with shouldRegister
You can hide tools from unauthorized users entirely by overriding shouldRegister. If it returns false, the tool does not appear in the Laravel MCP capabilities listing:
This is the primary authorization mechanism in Laravel MCP. For finer-grained checks inside a tool, use standard Laravel authorization:
There are no MCP-specific gates or policies. Use the ones you already have.
What You Can Do in the Authorization View
When an MCP client authenticates, Passport shows an authorization view. Publish the views with php artisan vendor:publish --tag=mcp-views and override them in your AppServiceProvider.
This screen is the moment your user decides whether to grant access. In that view, and in your MCP server more broadly, you have the full surface area of Laravel available:
- Show which tools the client is requesting access to
- Display the client name and redirect URI so users can verify the request is legitimate
- Require multi-factor authentication before approval
- Log the authorization event for audit trails
- Notify the user via email or Slack when a new client connects
- Allow users to revoke tokens from their account settings page
- Scope the authorization to specific resources (e.g., only tasks in a given project)
- Show a branded consent screen that matches your app's design
Security Best Practices
The MCP spec identifies four attack vectors every production server must address.
Token passthrough is explicitly forbidden by the spec. Never forward the token an MCP client sends you to a downstream API. Store third-party credentials separately in your database and use them directly inside tool handlers. Passing tokens through breaks rate limiting, audit trails, and audience validation.
Session hijacking becomes possible when sessions are used in place of per-request authentication. Do not use sessions for authentication. Validate a bearer token on every request. If you queue any session-related events, key them by user_id:session_id, not session ID alone.
Scope minimization limits the blast radius when a token leaks. The mcp:use scope laravel/mcp advertises is intentionally minimal, so keep it that way. Never use wildcard scopes.
Enforce fine-grained authorization inside each tool with $request->user()->cannot(...) regardless of what the token scope allows.
Check the Model Context Protocol documentation for more security best practices.
Build a Secure Laravel MCP Server
Authentication in MCP shouldn’t be an afterthought. A tool that leaks another user's tasks or an agent loop that hammers your database because you forgot a rate limiter, isn't a minor bug. It's a production incident waiting to happen.
The laravel/mcp package handles the hard parts. Your job is to wire it together correctly and not undo its protections.
When in doubt, return to the two questions that matter: Who is this user? ($request->user()) and Should they see this tool? (shouldRegister). Everything else plugs into patterns you already know from Laravel.
For the full API reference, see the Laravel MCP documentation or clone the Laravel Locket demo app to see auth wired up end-to-end.