Blog /

Product

Product September 26, 2019

Vapor: Reusable Vendors

Beginning today, we are launching a new, opt-in feature for Laravel Vapor that allows Vapor to reuse the "vendor" directory from previous deployments if the contents of the vendor directory has not changed. This new feature has been launched to solve two problems. **First, since we no longer have to upload the vendor directory for every deployment, we can deploy projects significantly faster.** Secondly, large projects sometimes exceed the size constraints on AWS Lambda code artifacts. AWS restricts the size of zipped Lambda deployment artifacts to 50mb. **By uploading and handling the vendor directory separately, we can work around this restriction. However, please note that the total disk size of AWS Lambda instances is still limited to 512mb.** To begin using this feature, please upgrade your `vapor-cli` and `vapor-core` package installations to their latest versions. Next, add the `separate-vendor` flag to your `Vapor.yml` file: ``` id: 5 name: vapor-local-test separate-vendor: true ```

Taylor Otwell

Product August 8, 2019

Cashier v10

We're very excited to announce the immediate availability of Cashier v10. This new Cashier release is a major update with lots of changes to Cashier's internals and public API. Cashier has been upgraded to support the new [Payment Intents](https://stripe.com/docs/payments/payment-intents) and [Payment Methods](https://stripe.com/docs/payments/payment-methods) APIs from Stripe as well as handle European [Strong Customer Authentication (SCA)](https://stripe.com/guides/strong-customer-authentication) regulations. In this blog post, we'll briefly go over some of the major changes. For more thorough information, read [the upgrade guide](https://github.com/laravel/cashier/blob/10.0/UPGRADE.md) as well as [the new documentation](https://laravel.com/docs/billing). Payment Intents --------------- Cashier uses the new Stripe Payment Intents API, which means that it now fully supports secondary payment actions like 3D Secure. The new Payment Intents API is now Stripe's preferred way of handling all transactions. Because of PSD2 & SCA regulations, which were introduced in the EU, banks can now require card payments to provide a secondary confirmation action. Often, this is a 3D Secure confirmation. Because of these regulations, Cashier needed a way to inform users that a secondary payment confirmation action was required, as well as provide an easy method of completing that secondary action. In Cashier v10, exceptions will be thrown for any payment actions that might trigger a secondary payment action, such as creating a new subscription: ``` use Laravel\Cashier\Exceptions\IncompletePayment; try {   $subscription = $user->newSubscription('default', $planId)     ->create($paymentMethod); } catch (IncompletePayment $exception) {   return redirect()->route(     'cashier.payment',     [$exception->payment->id, 'redirect' => route('home')]   ); } ``` In the example above, the exception is caught and the user is redirected to the new payment confirmation page that ships with Cashier: ![](https://laravel-blog-assets.s3.amazonaws.com/M1kbK19o7JIA7kGFcFWvA8JsbwhKV4os1Jh6pzQh.png)
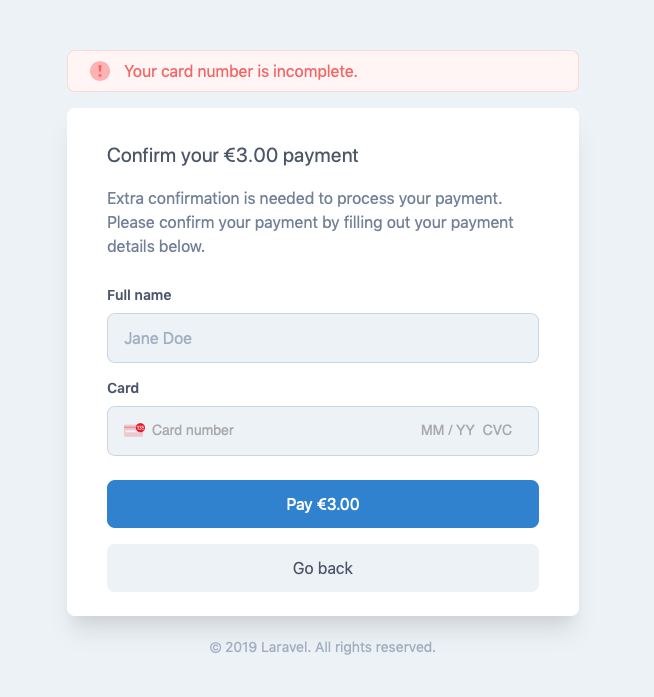
After confirming the payment, the user will be redirected to the path you specify. Cashier's payment confirmation page can be published to your own application so that you can customize the screen to match the look and feel of your own application. > To learn more about gathering payment methods and creating subscriptions, please refer to [the complete Cashier documentation](https://laravel.com/docs/billing). Payment Methods --------------- Stripe's new [Payment Methods API](https://stripe.com/docs/payments/payment-methods) is the new preferred way of gathering payment method information and exchanging that information for a secure token that can be used to generate charges or create subscriptions. Per Stripe's recommendations, the previous "Sources" and token based Stripe APIs have been removed from Cashier and replaced by the new Payment Methods API. Stripe provides complete backwards compatibility with the old Sources API, so customers that already subscribed to your application will continue to be charged as expected. Much More --------- In addition to support for Payment Intents and Payment Methods, there's a variety of additional changes and improvements like: - Proper support for currency locales - Secondary payment action notifications - Auto registration of webhooks - Improved currency formatting - A new invoice layout - And much more We hope you enjoy this new Cashier release!

Dries Vints

Product April 16, 2019

Cashier 9.3

Information about the new 9.3 release and the upcoming major v10 release.

Dries Vints

Product February 7, 2019

Connect to your Forge server using SSH or SFTP

Using Laravel Forge you can easily configure push-to-deploy to your sites, you can also manually deploy from the dashboard. However, sometimes you wish to access your sites' files directly using SSH or SFTP. To be able to do that you'll need to add your machine's public key to the server, this step allows the SSH service on your server to identify connections from your computer and grant access. > Depending on your Operating System, you can find guides on how to generate an SSH key [in this link](https://confluence.atlassian.com/bitbucketserver/creating-ssh-keys-776639788.html). To add an SSH key to your server, head to the SSH Keys section of the server settings screen: ![](https://laravel-blog-assets.s3.amazonaws.com/hjVjJrzw3v1GBhswZu8HZsAIlWRzefLSaTsjGgtY.png)Once the key is added, you can SSH into your instance using the following command: ``` ssh forge@ip_address_here ``` To use SFTP, you need to download an SFTP client like [FileZilla](https://filezilla-project.org/) or [Cyberduck](https://cyberduck.io/). Once you run the client, provide the credentials as follow: - Protocol: `SFTP` - Address/Server: `your_ip_address` - Port: `22` - Username: `forge` - Password: Leave this blank. - SSH Private Key: Location to the private key on your machine. Once you press connect, the client will communicate with the server and acquire access to all the files and directories.

Mohamed Said

Product January 22, 2019

Forge Alias Domains

Beginning today, you may associate multiple top-level, root domains with a single Forge site. To get started, add the aliases on the "Meta" tab of your site's management panel: ![](https://laravel-blog-assets.s3.amazonaws.com/S2PynDQ5RO2blRaoNeryDoqUM582fL6HRcvQqDMq.png)Forge will automatically take care of configuring of redirecting the "www" sub-domain to the root domain. Or, if the alias contains "www", Forge will automatically redirect the root domain to the "www" sub-domain. If your site is using SSL, you are responsible for ensuring that your activated SSL certificate contains all of the domains that your site responds to. If you don’t have a [Forge](https://forge.laravel.com) account, now is a great time to sign up. Forge allows you to painlessly create and manage PHP 7.3 servers which include MySQL, Redis, Memcached, and everything else you need to run robust, modern Laravel applications.

Taylor Otwell

Product January 15, 2019

Filter Forge Servers By Circle

If you manage a lot of servers using Forge, it can become cumbersome to find servers within your server list. To mitigate this, we've just launched a new feature to allow you to filter your servers by the circle they belong to! ![](https://laravel-blog-assets.s3.amazonaws.com/wPs1i4rIUZ2CQhJ11t8czMr9zxOmii4e9Ivh1F5t.png)If you don’t have a [Forge](https://forge.laravel.com) account, now is a great time to sign up. Forge allows you to painlessly create and manage PHP 7.3 servers which include MySQL, Redis, Memcached, and everything else you need to run robust, modern Laravel applications.

Taylor Otwell

Product October 31, 2018

Envoyer: Import Forge Servers

Many people pair the convenient server provisioning of Forge with the zero-downtime deployment magic provided by Envoyer. Previously, when adding Forge servers to your Envoyer project, you needed to copy over the server name, IP address, deployment path, PHP version, and more. Then, once added, you needed to go back to Forge and add Envoyer’s SSH key to the server. Today, I’m excited to announce that you will never have to do that again! You can now link your Forge API token to Envoyer in your user profile: ![](https://laravel-blog-assets.s3.amazonaws.com/5qYl8MTyumMuYodaj4KgfaP3hNneraMPPWiklAKb.png)Then, on your project’s “Servers” tab, you can click the “Import Forge Server” button. Envoyer will present you with a list of Forge server’s and their associated sites. **Once imported, Envoyer will automatically add the necessary SSH key to the selected server using Forge’s API.** It couldn’t be easier: ![](https://laravel-blog-assets.s3.amazonaws.com/3aOak7w9Muj657mG6sjAoMmu2k6pXqHL82GbAkXX.png)![](https://laravel-blog-assets.s3.amazonaws.com/gotYYYaUOXhyiBRPcr3sfOM4fEupddcnB2IiArJl.png)This new addition makes it much easier to add your Forge servers to your Envoyer projects. We hope you enjoy it. *If you don’t have an* [*Envoyer*](https://envoyer.io) *account, now is a great time to sign up. Envoyer allows you to deploy your applications with absolutely zero downtime to multiple servers. Give it a shot today!*

Taylor Otwell

Product October 29, 2018

Cashier 8.0 Webhook Improvements

Last week we tagged version 8.0.0 of Laravel Cashier. This release should not contain any breaking changes from the 7.0 series of Cashier; however, thanks to a community contribution, the release does add automatic support for more Stripe webhooks.

Taylor Otwell

Showing 161 - 170 of 172 results

Stay connected with the latest Laravel news